Understanding CI/CD with Databricks and GitHub
Introduction: Why Automate Your Code Deployment?
Imagine you’ve just finished a critical update to a Python script that your entire team uses. The code lives in a shared folder in Databricks. To deploy it, you have to remember to manually navigate to that folder and click the “Pull” button to get the latest version from GitHub. What happens if you forget? Or if a teammate accidentally pulls an older version? This manual process is slow and introduces the risk of human error, potentially deploying the wrong code to your most important environment.
This is the exact problem that CI/CD (Continuous Integration/Continuous Deployment) solves. At its core, CI/CD is an automated system designed to ensure that as soon as a code update is approved and merged into your project’s main branch on GitHub, that code is instantly and reliably updated in your production Databricks folder.
This guide will walk you through the fundamental workflow for setting up CI/CD between Databricks and GitHub, breaking down the core concepts into simple, understandable steps.
——————————————————————————–
A Note on Roles: Admin vs. Developer
Before diving in, it’s helpful to understand the two key roles involved in this process: the Admin and the Developer.
- The Admin performs the one-time setup. This includes creating the restricted production folders in Databricks, configuring the GitHub Actions automation, and managing the necessary security tokens. Their goal is to build a safe and reliable automated pipeline.
- The Developer uses the system daily. This involves cloning repositories, creating branches to develop features, and submitting Pull Requests for review. Their goal is to write and ship code efficiently and safely.
This guide covers both perspectives, but keeping this separation in mind will clarify why certain steps are designed the way they are.
——————————————————————————–
1. The Core Idea: Separating Your Development and Production Workspaces
The foundation of a safe and reliable CI/CD process is a clear separation between where developers write code and where the final, official code lives. In this workflow, a best-practice approach is to use two distinct Git folders inside Databricks, even though both point to the same GitHub repository. This separation is crucial.
The table below compares these two locations:
Developer Workspace (/Users/...) | Production Workspace (/repos/...) |
| * Purpose: This is the developer’s personal sandbox. It’s where you clone the repository to create new code, fix bugs, or experiment with new features. | * Purpose: This folder holds the official, stable version of the code that your production jobs and projects rely on. |
| * Permissions: You have full read and write access here. You can freely create new branches, commit your changes, and push code to GitHub. | * Permissions: Access is highly restricted. Developers typically have read-only access, preventing any direct, manual changes. |
| * Analogy: Think of this as your personal draft notebook, where you can write, erase, and edit as much as you need to. | * Analogy: This is the final, published book. It should only be updated by the publisher (our automation) after a formal review process. |
This restriction on the production workspace is the cornerstone of CI/CD. It forces all changes to go through the audited, approved, and automated Pull Request workflow, eliminating unauthorized “hotfixes” or manual errors in production.
Now that we understand where the work is done, let’s explore how a developer performs their tasks in their dedicated workspace.
——————————————————————————–
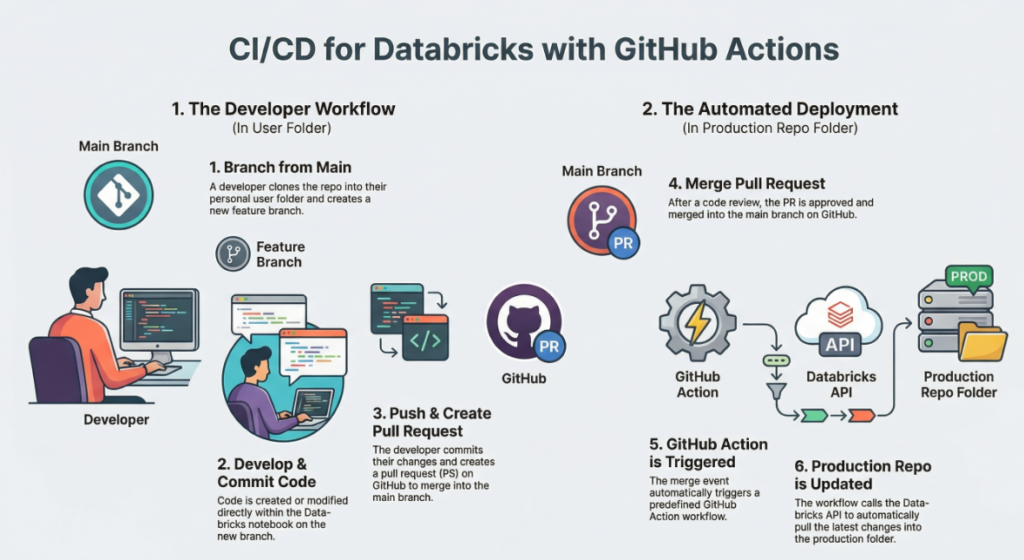
2. A Developer’s Journey: From New Branch to Pull Request
This section outlines the standard, day-to-day workflow for a developer contributing code within this structured system. Each step is designed to be safe, isolated, and collaborative.
- Clone the Repository
- What: The developer first creates a personal copy of the code from GitHub into their private
/Usersfolder in Databricks. - Why: This gives them a complete, independent copy of the project to work on without any risk of impacting the live, production code.
- What: The developer first creates a personal copy of the code from GitHub into their private
- Create a Feature Branch
- What: Before writing any code, the developer creates a new “branch” (e.g.,
feature-add-new-chart) from the main codebase. - Why: Branching creates a safe, isolated environment for development. All new changes are contained within this branch, preventing unstable or unfinished code from mixing with the stable
mainbranch.
- What: Before writing any code, the developer creates a new “branch” (e.g.,
- Develop and Change Code
- What: This is the creative step. The developer writes new Python scripts, modifies existing Databricks notebooks, and builds out their new feature within their specific feature branch.
- Why: All work happens in the developer’s private workspace, allowing for iteration and testing without affecting anyone else.
- Commit and Push Changes
- What: The developer “commits” their changes, which is like saving a snapshot of their work with a descriptive message. They then “push” these saved commits from their Databricks workspace up to the corresponding branch on GitHub.
- Why: This backs up the work to the central GitHub repository and makes it visible to other team members.
- Create a Pull Request (PR)
- What: In GitHub, the developer opens a Pull Request. This is a formal proposal to merge the new code from their feature branch into the protected
mainbranch. - Why: The PR is the central point of governance and quality control. It is the only gateway to production, triggering both human code review for approval and the automated deployment process upon merging.
- What: In GitHub, the developer opens a Pull Request. This is a formal proposal to merge the new code from their feature branch into the protected
Once the pull request is approved and merged, how does the code get into the production folder without anyone manually clicking “pull”? This is where the automation begins.
——————————————————————————–
3. The Automation Magic: How GitHub Actions Update Databricks
The engine that powers the “Continuous Deployment” part of CI/CD is GitHub Actions. Think of it as a tool that can automatically run a script whenever a specific event happens in your GitHub repository.
The triggering event in this workflow is a successful merge or push of code into the project’s main branch. (Note: The target branch is typically named main, as used here, though older repositories may still use master.) In a real-world scenario, the main branch would be a protected branch in GitHub, preventing direct pushes and ensuring this merge event is the only way to trigger the workflow.
When this trigger occurs, the GitHub Action automatically runs a script whose core task is simple but powerful: it remotely triggers the “pull” action on the production Databricks Git folder (/repos/...), forcing it to update with the latest code from the main branch.
For this automation script to work, it needs three essential pieces of information:
- Databricks API Endpoint: This is the specific URL (Uniform Resource Locator) that the GitHub Action sends its automated command to. It acts as the digital address for the Databricks API. The script uses a
PATCHrequest because it is partially modifying an existing resource (the repo) by telling it to update to a new branch version, rather than replacing it entirely. - Databricks Personal Access Token (PAT): This is a secure, long-term password that proves the GitHub Action has permission to interact with your Databricks workspace. It authenticates the script’s API request, ensuring that only authorized processes can make changes. In a real implementation, this token would be stored securely as a GitHub Actions Secret and referenced in the script, never hardcoded directly into the file.
- Repo ID: This is the unique identifier for the specific production Git folder in Databricks. It tells the script exactly which folder to update, ensuring the command is sent to the correct location.
The key insight is that the GitHub Action is simply a script that automates an API call. This call perfectly mimics what a person does when they click the “Pull” button in the Databricks UI, making the entire update process instant, consistent, and error-free.
——————————————————————————–
4. The Complete CI/CD Flow: Putting It All Together
Let’s synthesize everything into a single, end-to-end workflow, following a single line of code from a developer’s machine to its automatic deployment in production.
- A developer, working in their personal
/Usersfolder in Databricks, commits and pushes a code change (e.g., addingprint("hello world after CICD")to a file) to theirfeaturebranch on GitHub. - In GitHub, the developer opens a Pull Request to merge the
featurebranch into themainbranch. - After a successful code review by teammates, the Pull Request is merged.
- This merge is the trigger! The pre-configured GitHub Action automatically starts running.
- The Action’s script authenticates itself using the Personal Access Token (PAT) and sends a
PATCHAPI request to the Databricks endpoint, targeting the specificrepo_idof the production folder. - The production Git folder located in the
/reposdirectory receives this command and immediately pulls the latest version of themainbranch from GitHub. - Success! The new code, including the new
printstatement and any other files, is now live and available in the production Databricks environment—all without a single manual click.
By adopting this automated system, you create a robust and efficient pipeline for deploying code changes.
——————————————————————————–
5. Key Benefits for You
Adopting this CI/CD process offers three transformative benefits, especially for a new developer or a growing team.
- Safety and Reliability By separating development and production workspaces and using a formal Pull Request process, you prevent accidental changes to critical code. Automating the deployment step eliminates the risk of human error, ensuring that what was tested and approved is exactly what gets deployed.
- Speed and Efficiency Automation removes the manual, time-consuming, and tedious step of deploying code. Once a change is approved, it goes live instantly. This allows developers to focus on building features, not on managing deployments.
- Collaboration The entire workflow is centered on the Pull Request. This provides a clear, structured, and transparent process for teams to review code, discuss changes, and share knowledge before anything is integrated into the main codebase. It fosters a culture of quality and shared ownership.